
%2520-%25202026-07-01T150219.190.jpg&w=3840&q=75)


iPhoneとAndroidにeSIMをインストールする方法:ステップ別ガイド
到着した瞬間にスマートフォンがつながったら?GigSkyアプリを使って、iPhoneやAndroidにeSIMをインストールする方法をご紹介します。
旅行前のeSIMの設定は、iPhoneなら数分、Androidではもう少し時間がかかります。
このガイドでは、iPhoneにeSIMをインストールする方法と、Androidで同様の設定を行う方法を、GigSkyアプリを例にわかりやすく解説します。このアプリなら、QRコードの読み取りや通信事業者の手動設定は一切不要です。
クレジットカード不要の無料トライアルでお試しいただくか、お持ちのVisaカードが対象の場合、175以上の渡航先で最大5GBの無料データ通信を利用できるかご確認ください。
eSIMを正しくインストールしてラベルを設定しておけば、到着した瞬間にスマートフォンが接続されるため、空港でトラブルシューティングをする必要はありません。
荷造りや搭乗券の印刷に追われていると、つい後回しになりがちなのが、スマートフォンのデータ通信プランの確認です。
そして現地に到着すると、空港で最初の20分間、なぜ何も使えないのかを必死に突き止めることになります。
そんな悩みも、eSIMなら解決できます。出発前に設定しておけば、到着後すぐに使えます。
GigSkyを無料でお試しください。今すぐアプリをダウンロードすれば、このガイドの残りを読み終えたときにeSIMの無料トライアルをご利用いただけます。
まずこの2つを確認してください
低価格のAndroidスマートフォンは互換性の面で例外となるため、よく分からない場合は、お使いの機種を直接検索すれば、対応しているかどうかがはっきり分かります。
両方の検査で問題がなければ、準備完了です。
契約前に試してみたいですか?無料のeSIMを入手する2つの方法
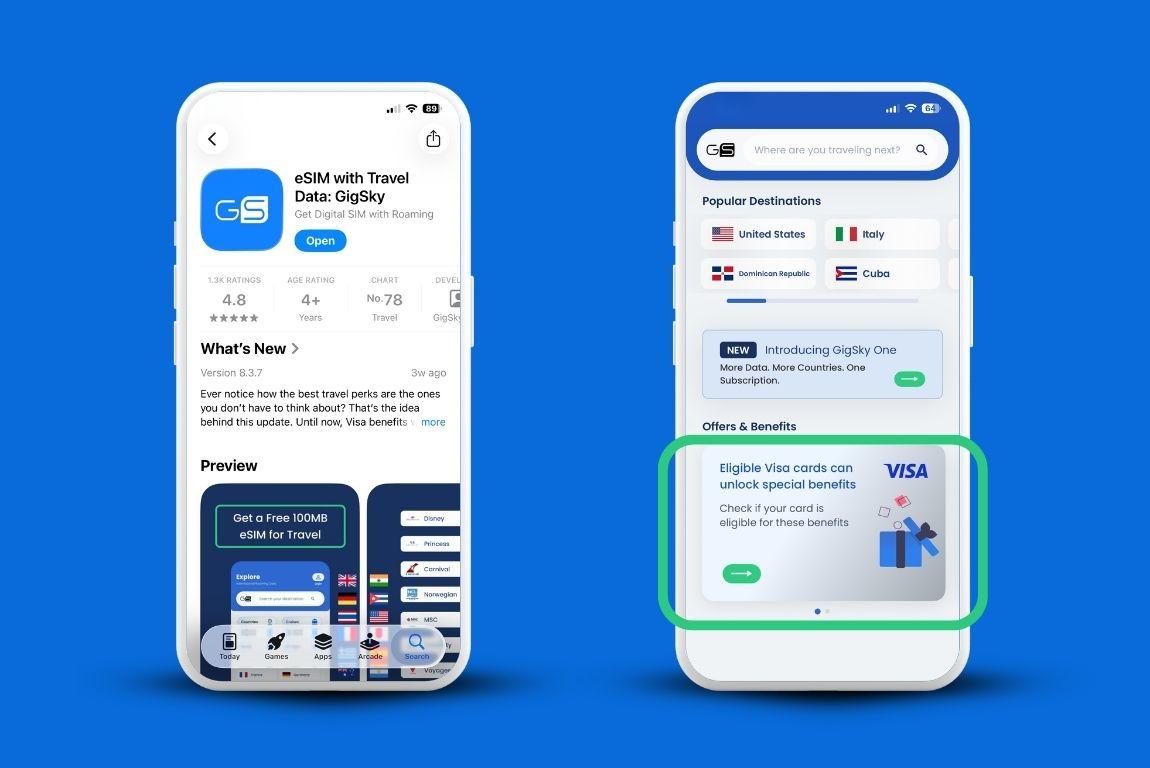
GigSkyでは、アプリ内でeSIMの無料トライアルをご利用いただけます。クレジットカードは不要です。アプリをダウンロードすると、ホーム画面にトライアルが表示されます。
データ容量は少量ですが、接続が正常に機能していることと、お使いの端末でeSIMが正しく認識されていることを確認するには十分です。
もう一つの方法は、対象となるVisaカードの特典を利用することです。対象となるVisaカード会員は、最大5GBのデータ通信を無料で利用できます。この特典は175以上の渡航先で、プランの引き換え日から15日間有効です。
GigSkyアプリ内の「Visa特典」タブから対象資格をご確認ください。カード番号を入力する必要がありますが、料金が請求されることはありません。これは対象資格を確認するためだけのものです。
iPhoneにeSIMをインストールする方法
以下の手順は、iOS 16以降を搭載したiPhoneに適用されます。iPhone 12、14、15、16のいずれも手順は同じです。
ステップ1:「今すぐインストール」をタップ
GigSkyアプリを開きます。「My Plans」に移動します。ご利用のプランを見つけて、「Install eSIM」をタップします。今すぐインストールするか、後でインストールするかを尋ねるメッセージが表示されます。「Install Now」をタップします。
ご注意ください:すでにプランの対象国または地域にいる場合、インストールするとプランがすぐに開始されることをアプリが警告します。開始タイミングについては、このあと詳しく説明します。
ステップ2:「このデバイスにインストール」を選択します
最初の案内の後、「Get Started」画面が表示され、「Install on this device」というボタンが現れます。それをタップしてください。その下には、別のデバイス(iOS、iPadOS、Android、Windows)にインストールするためのオプションが表示されます。これは、ほかの人のスマートフォン用にプランを購入した場合に必要です。
ステップ3:手順を確認し、「始める」をタップします
「準備」画面では、この後の手順が案内されます。モバイルデータ通信にはGigSkyプランを設定し、通話とiMessageにはご利用中の通信事業者を「主回線」として設定するよう案内されます。内容を確認し、Wi-Fiに接続していることを確かめてから、「始める」をタップしてください。eSIMをダウンロードするにはWi-Fi接続が必要です。
ステップ4:iOSから確認を求められたら「有効にする」をタップします
iPhoneに新しいeSIMを追加する許可を求める画面が表示されます。プロファイルを確認するため、EIDがネットワークと共有されます。「アクティベート」をタップすると、設定が続行されます。
ステップ5:「続ける」をタップします
新しいGigSky eSIMの準備ができたことを示す画面が表示されます。「続ける」をタップすると、iPhoneが数秒ですべての設定を完了します。
ステップ6:「完了」をタップします
「モバイル通信の設定が完了しました」と表示されたら、「完了」をタップします。これでeSIMがスマートフォンに設定されました。
ステップ7:モバイル通信プランを追加する
iOSが新しいプランを検出し、追加するよう案内します。[続ける]をタップして確定してください。
ステップ8:プランのラベルを設定する
これは多くの人が飛ばしてしまい、その結果、海外でも自国の通信事業者がデータ通信を処理しているのはなぜだろうと疑問に思うことになる手順です。iOSでは、モバイル通信プランにラベルを付けるよう求められます。GigSkyプランを「モバイルデータ通信」に、自国の通信事業者のプランを「主回線」に設定してください。その後、「続ける」をタップします。これにより、旅行中にデータ通信でどちらの回線を使用するかがiPhoneに指定されます。
ステップ9:「モバイルデータ通信の切り替えを許可」をオフにする
ラベル設定の直後に、「モバイルデータ通信の切り替えを許可」というトグルが表示されます。これをオフにしてください。オンのままだと、GigSkyの電波が弱くなった際に、スマートフォンが気付かないうちに普段お使いの通信事業者のデータ通信へ切り替わり、その通信事業者から意図しないローミング料金を請求される可能性があります。次の画面では、普段お使いの通信事業者の回線についてもデータローミングをオフにしてください。
ステップ10:設定を開き、GigSkyを選択して、回線をオンにします
「設定」を開いて「モバイル通信」をタップし、SIMの一覧からGigSkyを選択して、「この回線をオンにする」をオンにします。これで完了です。eSIMがインストールされ、利用できる状態になりました。
GigSkyのラベルを「モバイルデータ通信」に、自宅用プランを「主回線」に設定します。次に、「モバイルデータ通信の切り替えを許可」をオフにしてください。この2分ほどの設定で、後々の面倒を大幅に減らせます。
AndroidにeSIMをインストールする方法
Androidではメーカーによってメニュー名が異なるため、手順がやや複雑です。GigSkyアプリでの開始手順は同じですが、実際のインストールはスマートフォンのシステム設定に切り替えて行います。以下では、Samsung GalaxyとGoogle Pixelの両方の手順を説明します。
ステップ1:アプリ内の「今すぐインストール」をタップします
GigSkyを開き、「My Plans」に移動して、ご利用のプランの横にある「Install eSIM」をタップします。「Install Now」をタップして確定してください。iPhoneの場合と同様に、対象エリア内でインストールすると、プランがすぐに開始される点にご注意ください。
ステップ2:「このデバイスにインストール」を選択します
[はじめに]画面で、[このデバイスにインストール]をタップします。下に、Android、iOS、iPadOS、Windows向けの各デバイスオプションが表示されます。
ステップ3:もう一度「今すぐインストール」をタップします
もう一度「今すぐインストール」という確認メッセージが表示され、続行するかどうかを確認されます。それをタップすると、スマートフォンの設定画面に移動します。
ステップ4:デバイスに名前を付ける
The app asks you to label the device. Something simple works, like your name or just the phone model. Useful if you're managing multiple GigSky devices in the same account.
Step 5: Tap "Install eSIM" and Head to Settings
Tap Install eSIM in the app. Make sure you're connected to Wi-Fi. The app then hands off to your phone's system settings to pull down the eSIM profile.
Step 6: Navigate to SIM Settings
On Google Pixel: Settings, then Network & Internet, then SIMs, then Add SIM. On Samsung Galaxy: Settings, then Connections, then SIM Manager, then Add SIM. Both get you to the same screen.
Step 7: Download and Set Up the eSIM
Select Set up an eSIM. On Pixel, tap Use a different network. On Samsung, tap Other ways to connect to a mobile network. Then tap Scan QR code, or if you're following the in-app flow, the GigSky profile should already be available to select from the list.
Step 8: Select GigSky
GigSky will appear in the list of available profiles. Tap it to download and install the eSIM.
Step 9: Turn on the Line Before You Leave
Go back into Settings and find GigSky in your SIM list. Toggle Use SIM to on. You'll see your data balance and how many days are left on the plan. Turn this on the day before departure or right as you're heading out the door.
Always confirm Wi-Fi is connected before your phone goes into Settings to download the eSIM profile. A dropped connection mid-download can interrupt the installation and require you to start over.
Need to Use a QR Code But Only Have One Phone?
Most travelers won't need one. With GigSky, the app handles installation directly. But if you're troubleshooting how to install eSIM on iPhone without a second device or printer, most modern phones can scan a QR code from a saved screenshot.
On iPhone running iOS 17.4 or later: take a screenshot of the QR code from your email, save it to Photos. Then open the Camera app (not Photos), tap the photo library icon at the bottom left, find the screenshot, and tap and hold the QR code. An Add eSIM option will appear.
On Samsung Galaxy: screenshot the QR code with power plus volume down. Go to Settings, Connections, SIM Manager, Add SIM, Set up an eSIM, Other ways to connect to a mobile network, Scan QR code, and then tap the photo gallery icon to pick your screenshot.
On Google Pixel: same screenshot method. Then Settings, Network & Internet, SIMs, Add SIM, Set up an eSIM, Use a different network, and tap Scan from photo.
Not every Android device supports QR scanning from a saved photo. If yours doesn't, a free QR code scanner from the Play Store fills the gap.
When Should You Install Your eSIM Before a Trip?
The day before departure, or a few hours before you leave, is the sweet spot.
Here's why timing matters: your data plan starts counting from the moment it's set up on your device in a covered location.
You have up to one year from purchase to set up the plan, which gives you flexibility. But once it's live, the clock is running.
Setting it up a week before you fly means you've already used several days of your plan before the trip even begins.
The better move: install the eSIM a day or two before departure while you're still home and on Wi-Fi.
Then turn the line on once you're heading to the airport or just before takeoff. Your plan starts when you need it, not before.
If you're cruising with GigSky, the same logic holds. Install it before you board. Coverage runs across 290+ ships at sea, not just in port, so you'll have data between destinations, not just when the ship stops.
A Few Questions That Come Up After Setup
Can I still receive calls and texts on my regular number?
Yes, your home SIM stays active for calls and SMS. The dual-SIM setup lets GigSky handle data while your primary line handles everything else.
Just know that answering calls or sending texts through your home number while abroad may still trigger roaming fees from your home carrier, depending on your plan. Check with them before you travel if that's something you want to avoid.
What if I buy a plan and my trip gets canceled?
With GigSky, you have up to one year from the date of purchase to set up the plan. If your trip falls through, the plan stays in your account and you can use it for a future trip to the same region, as long as you set it up within that window.
Do I need to go through this whole process every time I travel?
No. The eSIM installs once and stays on your phone. For future trips, you just buy a new plan in the app, turn on the GigSky line before you leave, and you're good. Nothing to reinstall.
Do I need a computer to know how to install eSIM on iPhone?
No. Everything happens inside the GigSky app and your iOS settings. No computer, no QR printer, no extra hardware needed.
The plan started right when I installed it. Is that a problem?
It happens when you're already in a location your plan covers at the time of installation. The app gives a warning before this happens, so if you missed it, that's what occurred. Reach out to GigSky support through the Help tab in the app and they can look at your account.
Try GigSky Free anytime from the app's home screen, no commitment required before your trip.
Quick Recap: How to Install eSIM
- Confirm your phone is eSIM compatible and carrier-unlocked before anything else
- Connect to Wi-Fi before starting the installation on either device
- How to install eSIM (iPhone): go to My Plans in the GigSky app, tap Install eSIM, label your plans (GigSky = Cellular Data, home = Primary), and turn off Allow Cellular Data Switching
- Android: start in the GigSky app, then complete the installation through Settings under SIM or Network & Internet depending on your device
- Set up the eSIM a day before departure while still at home, turn the line on when you're actually heading out
- Your data plan starts counting from the moment it's set up in a covered location, and you have up to one year from purchase to set it up
- Calls and texts on your home number still work, but check with your carrier about roaming fees for those
- No QR code needed with GigSky, but if you ever need one and only have one phone, iOS 17.4+ and most Android devices can scan from a saved screenshot
- To try before committing, use the free trial in the app or check your eligible Visa card benefits under the Visa Benefits tab
This covers how to install eSIM on iPhone and Android before you ever leave home. Download the GigSky app, search your destination or cruise line, and get set up before your next trip.