
%2520-%25202026-07-01T150219.190.jpg&w=3840&q=75)


Jak zainstalować kartę eSIM na iPhonie i urządzeniu z Androidem — instrukcja krok po kroku
A gdyby Twój telefon mógł połączyć się z siecią od razu po wylądowaniu? Dowiedz się, jak zainstalować kartę eSIM na iPhonie i urządzeniu z Androidem za pomocą aplikacji GigSky.
Konfiguracja eSIM przed podróżą zajmuje kilka minut na iPhonie i nieco dłużej na urządzeniu z Androidem.
W tym poradniku wyjaśniamy, jak zainstalować kartę eSIM na iPhonie oraz przeprowadzić taką samą konfigurację na urządzeniu z Androidem, korzystając z aplikacji GigSky jako przykładu, ponieważ pozwala ona całkowicie pominąć kody QR i ręczne ustawienia operatora.
Możesz wypróbować tę usługę w ramach bezpłatnego okresu próbnego, który nie wymaga podawania danych karty kredytowej, lub sprawdzić, czy Twoja kwalifikująca się karta Visa zapewnia do 5 GB bezpłatnego transferu danych w ponad 175 miejscach na świecie.
Po zainstalowaniu i prawidłowym oznaczeniu karty eSIM telefon połączy się z siecią od razu po wylądowaniu — bez konieczności rozwiązywania problemów na lotnisku.
Gdzieś pomiędzy pakowaniem się a drukowaniem kart pokładowych łatwo zapomnieć o wyborze pakietu danych do telefonu.
A potem lądujesz gdzieś i spędzasz pierwsze dwadzieścia minut na lotnisku, próbując zrozumieć, dlaczego nic nie działa.
Karta eSIM rozwiązuje ten problem. Konfigurujesz ją przed wyjazdem, a po wylądowaniu jest od razu gotowa do użycia.
Wypróbuj GigSky za darmo. Pobierz aplikację już teraz, a po wykonaniu pozostałych kroków opisanych w tym przewodniku będzie na Ciebie czekać próbna karta eSIM.
Najpierw sprawdź te dwie rzeczy
Budżetowe telefony z Androidem stanowią wyjątek pod względem kompatybilności, więc jeśli nie masz pewności, wyszukaj bezpośrednio swój model, a uzyskasz jednoznaczną odpowiedź.
Gdy wyniki obu kontroli będą prawidłowe, możesz ruszać.
Chcesz wypróbować przed podjęciem decyzji? Dwa sposoby na bezpłatną kartę eSIM
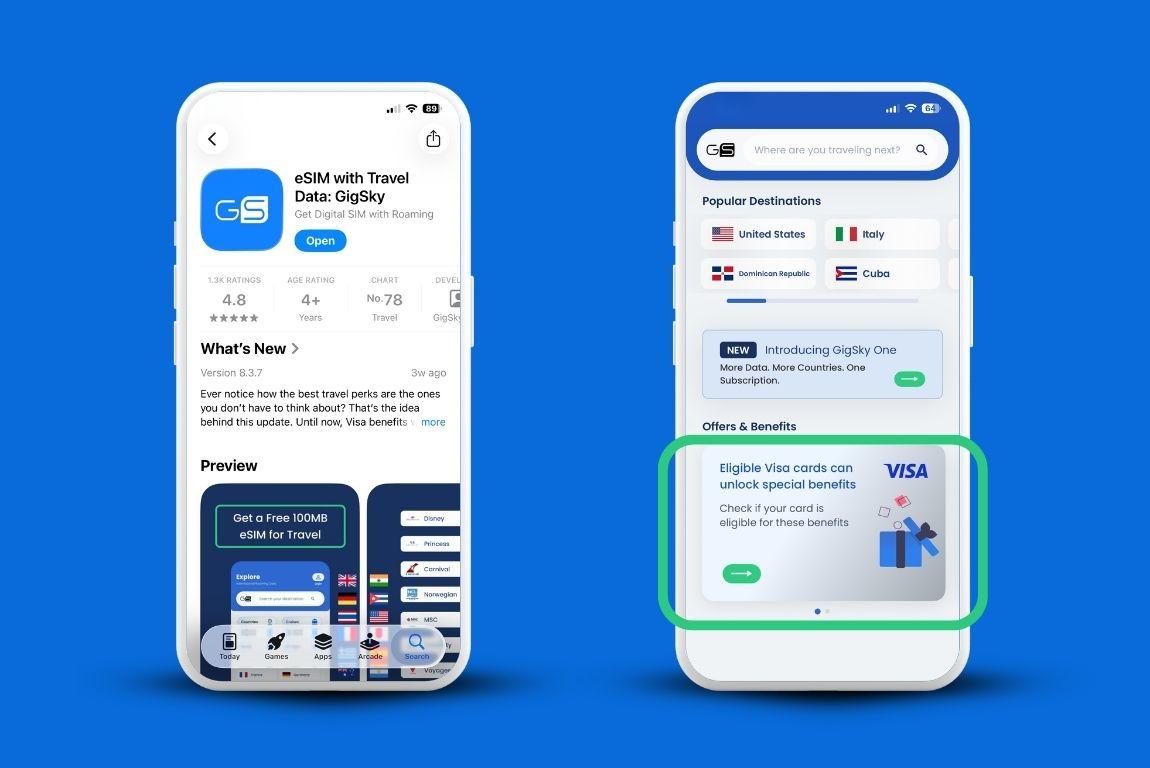
GigSky oferuje bezpłatny okres próbny eSIM dostępny w aplikacji. Karta kredytowa nie jest wymagana. Pobierz aplikację, a oferta próbna pojawi się na ekranie głównym.
To niewielki pakiet danych, wystarczający, aby sprawdzić, czy połączenie działa i czy urządzenie prawidłowo zaakceptowało kartę eSIM.
Inną możliwością jest skorzystanie z korzyści przysługującej posiadaczom kwalifikujących się kart Visa. Posiadacze takich kart otrzymują do 5 GB bezpłatnego transferu danych, ważnego w ponad 175 krajach i regionach przez 15 dni od momentu aktywacji pakietu.
Sprawdź, czy kwalifikujesz się do skorzystania z oferty, w zakładce Visa Benefits w aplikacji GigSky. Wpiszesz numer swojej karty, ale nie zostanie pobrana żadna opłata. Służy to wyłącznie sprawdzeniu uprawnień.
Jak zainstalować kartę eSIM na iPhonie
Te kroki dotyczą iPhone’ów z systemem iOS 16 lub nowszym. W przypadku iPhone’a 12, 14, 15 i 16 proces wygląda tak samo.
Krok 1: Dotknij „Zainstaluj teraz”
Otwórz aplikację GigSky. Przejdź do sekcji Moje plany. Znajdź swój plan i stuknij „Zainstaluj eSIM”. Pojawi się pytanie, czy chcesz zainstalować kartę teraz, czy później. Stuknij „Zainstaluj teraz”.
Heads up: if you're already in a country or region the plan covers, the app will warn you that installing will start the plan immediately. More on timing in a moment.
Step 2: Choose "Install on This Device"
After that first prompt, you'll land on a Get Started screen with a button that says Install on this device. Tap it. Below that you'll see options for installing on a different device (iOS, iPadOS, Android, Windows). That matters if you bought a plan for someone else's phone.
Step 3: Read the Instructions, Tap "Get Started"
A Getting Ready screen walks you through what comes next. It tells you to set your GigSky plan to Cellular Data and keep your home carrier as Primary for calls and iMessage. Read through it, make sure you're on Wi-Fi, then tap Get Started. Wi-Fi is required for the eSIM to download.
Step 4: Tap "Activate" When iOS Prompts You
Your iPhone will ask permission to add the new eSIM. It'll share your EID with the network to verify the profile. Tap Activate and the setup continues.
Step 5: Tap "Continue"
A screen confirms your new GigSky eSIM is ready. Tap Continue and your iPhone takes a few seconds to set everything up.
Step 6: Tap "Done"
When you see Cellular Setup Complete, tap Done. The eSIM is now on your phone.
Step 7: Add the Cellular Plan
iOS detects the new plan and prompts you to add it. Tap Continue to confirm.
Step 8: Set Your Plan Labels
This is the step most people skip and then wonder why their home carrier is still handling data abroad. iOS asks you to label your cellular plans. Set your GigSky plan to Cellular Data and your home carrier to Primary. Then tap Continue. This tells your phone which line to use for data when you're traveling.
Step 9: Turn Off "Allow Cellular Data Switching"
Right after the label step, you'll see a toggle for Allow Cellular Data Switching. Turn it off. If it stays on, your phone can quietly switch to your home carrier's data when GigSky signal dips, which can lead to unintended roaming charges from your home carrier. On the next screen, turn off data roaming for your home carrier line too.
Step 10: Open Settings, Select GigSky, Turn On the Line
Go to Settings, tap Cellular, find GigSky in your SIM list, and toggle Turn On This Line to on. That's it. The eSIM is installed and ready.
Set your GigSky label to Cellular Data and your home plan to Primary. Then turn off Allow Cellular Data Switching. That two-minute step saves a lot of headaches later.
How to Install eSIM on Android
Android is a bit more involved because the menu names vary by manufacturer. The GigSky app starts the process the same way, but then hands off to your phone's system settings for the actual installation. Steps for Samsung Galaxy and Google Pixel are both covered below.
Step 1: Tap "Install Now" in the App
Open GigSky, go to My Plans, and tap Install eSIM next to your plan. Confirm with Install Now. Same note as iPhone: if you're in a covered location, installing immediately starts the plan.
Step 2: Choose "Install on This Device"
On the Get Started screen, tap Install on this device. Different device options appear below for Android, iOS, iPadOS, and Windows.
Step 3: Tap "Install Now" Again
A second Install Now prompt confirms you want to proceed. Tap it and the app directs you to your phone's settings.
Step 4: Name Your Device
The app asks you to label the device. Something simple works, like your name or just the phone model. Useful if you're managing multiple GigSky devices in the same account.
Step 5: Tap "Install eSIM" and Head to Settings
Tap Install eSIM in the app. Make sure you're connected to Wi-Fi. The app then hands off to your phone's system settings to pull down the eSIM profile.
Step 6: Navigate to SIM Settings
On Google Pixel: Settings, then Network & Internet, then SIMs, then Add SIM. On Samsung Galaxy: Settings, then Connections, then SIM Manager, then Add SIM. Both get you to the same screen.
Step 7: Download and Set Up the eSIM
Select Set up an eSIM. On Pixel, tap Use a different network. On Samsung, tap Other ways to connect to a mobile network. Then tap Scan QR code, or if you're following the in-app flow, the GigSky profile should already be available to select from the list.
Step 8: Select GigSky
GigSky will appear in the list of available profiles. Tap it to download and install the eSIM.
Step 9: Turn on the Line Before You Leave
Go back into Settings and find GigSky in your SIM list. Toggle Use SIM to on. You'll see your data balance and how many days are left on the plan. Turn this on the day before departure or right as you're heading out the door.
Always confirm Wi-Fi is connected before your phone goes into Settings to download the eSIM profile. A dropped connection mid-download can interrupt the installation and require you to start over.
Need to Use a QR Code But Only Have One Phone?
Most travelers won't need one. With GigSky, the app handles installation directly. But if you're troubleshooting how to install eSIM on iPhone without a second device or printer, most modern phones can scan a QR code from a saved screenshot.
On iPhone running iOS 17.4 or later: take a screenshot of the QR code from your email, save it to Photos. Then open the Camera app (not Photos), tap the photo library icon at the bottom left, find the screenshot, and tap and hold the QR code. An Add eSIM option will appear.
On Samsung Galaxy: screenshot the QR code with power plus volume down. Go to Settings, Connections, SIM Manager, Add SIM, Set up an eSIM, Other ways to connect to a mobile network, Scan QR code, and then tap the photo gallery icon to pick your screenshot.
On Google Pixel: same screenshot method. Then Settings, Network & Internet, SIMs, Add SIM, Set up an eSIM, Use a different network, and tap Scan from photo.
Not every Android device supports QR scanning from a saved photo. If yours doesn't, a free QR code scanner from the Play Store fills the gap.
When Should You Install Your eSIM Before a Trip?
The day before departure, or a few hours before you leave, is the sweet spot.
Here's why timing matters: your data plan starts counting from the moment it's set up on your device in a covered location.
You have up to one year from purchase to set up the plan, which gives you flexibility. But once it's live, the clock is running.
Setting it up a week before you fly means you've already used several days of your plan before the trip even begins.
The better move: install the eSIM a day or two before departure while you're still home and on Wi-Fi.
Then turn the line on once you're heading to the airport or just before takeoff. Your plan starts when you need it, not before.
If you're cruising with GigSky, the same logic holds. Install it before you board. Coverage runs across 290+ ships at sea, not just in port, so you'll have data between destinations, not just when the ship stops.
A Few Questions That Come Up After Setup
Can I still receive calls and texts on my regular number?
Yes, your home SIM stays active for calls and SMS. The dual-SIM setup lets GigSky handle data while your primary line handles everything else.
Just know that answering calls or sending texts through your home number while abroad may still trigger roaming fees from your home carrier, depending on your plan. Check with them before you travel if that's something you want to avoid.
What if I buy a plan and my trip gets canceled?
With GigSky, you have up to one year from the date of purchase to set up the plan. If your trip falls through, the plan stays in your account and you can use it for a future trip to the same region, as long as you set it up within that window.
Do I need to go through this whole process every time I travel?
No. The eSIM installs once and stays on your phone. For future trips, you just buy a new plan in the app, turn on the GigSky line before you leave, and you're good. Nothing to reinstall.
Do I need a computer to know how to install eSIM on iPhone?
No. Everything happens inside the GigSky app and your iOS settings. No computer, no QR printer, no extra hardware needed.
The plan started right when I installed it. Is that a problem?
It happens when you're already in a location your plan covers at the time of installation. The app gives a warning before this happens, so if you missed it, that's what occurred. Reach out to GigSky support through the Help tab in the app and they can look at your account.
Try GigSky Free anytime from the app's home screen, no commitment required before your trip.
Quick Recap: How to Install eSIM
- Confirm your phone is eSIM compatible and carrier-unlocked before anything else
- Connect to Wi-Fi before starting the installation on either device
- How to install eSIM (iPhone): go to My Plans in the GigSky app, tap Install eSIM, label your plans (GigSky = Cellular Data, home = Primary), and turn off Allow Cellular Data Switching
- Android: start in the GigSky app, then complete the installation through Settings under SIM or Network & Internet depending on your device
- Set up the eSIM a day before departure while still at home, turn the line on when you're actually heading out
- Your data plan starts counting from the moment it's set up in a covered location, and you have up to one year from purchase to set it up
- Calls and texts on your home number still work, but check with your carrier about roaming fees for those
- No QR code needed with GigSky, but if you ever need one and only have one phone, iOS 17.4+ and most Android devices can scan from a saved screenshot
- To try before committing, use the free trial in the app or check your eligible Visa card benefits under the Visa Benefits tab
This covers how to install eSIM on iPhone and Android before you ever leave home. Download the GigSky app, search your destination or cruise line, and get set up before your next trip.